Making A Wooden Backband For Your
Kayak
 Back support installed, seat is closed
cell foam and is manufactured by our kit supplier Noah’s Marine.
The backband shown was constructed using three layers of 3mm [1/8”]
marine plywood laminated on a simple mold then covered with ½” [12mm] closed
cell foam. We have also made backbands from two layers of 4mm ply. The mold is
made by cutting an arc into a piece of 2 x 6 and drilling holes in it to allow
clamps to be used without them sliding around. Following these notes is an
illustration used in some of our plan sets to help guide builders through the
construction of their own backband. The blanks we make are 6” [15cm] tall and 24”
[60cm] wide, which are then modified to suit the boat and the paddler, the
shape being manipulated as required to get the desired fit, the narrower top of
the one pictured allowed it to sit slightly higher.
 Laminating the backband,’ F’ style clamps hold the pieces
together and to the mold, the other clamps are in place to make sure that the
other two pieces remain in full contact while the epoxy cures. Remember to
cover the top of the form with tape so the part does not accidentally get glued
to it.
When the
blank is removed from the mold it is trimmed to width, [final width of the
example is 16” [40cm], once cut to width it was shaped and finish applied. The
finish in this case consisted of a saturation coat of epoxy, and three coats of
marine varnish.
Mark the
center before the backband comes off the form to establish a reference line to
work from to ensure you make the backband symmetrical.
If you prefer your backbands to sit higher, scoop out the ends more,
and/or making the backband narrower will allow it to ride higher as does lowering
the top eye strap or raising the bottom two. I don’t recommend removing the
upper eye strap entirely as it keeps the backband from tipping forward,
interfering with entry into the boat.
Backband with hardware installed ready for installation in boat.
Three eye
straps are attached using oval head machine screws these will be covered by the
closed cell foam, (these were just lightly countersunk, too much will weaken
the area under the head) the straps to adjust the backbands location are
fastened in place at the same time, the dimensions we use are given in the
illustration. Two more eye straps are fastened under the aft deck using short
screws, using shockcord and the eye straps the paddler can control the location
of the backband. In some cases the coaming riser construction may not be robust
enough to hold screws run up through the deck, in this case wood blocks can be
epoxied to the underside of the deck and the eye straps fastened to them or you
could just hollow the middle of the wood block. When glued in place the channel
formed by the hollowed block would take the place of the eye strap.
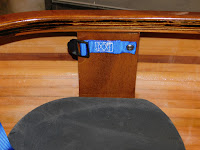
A strap with a buckle is attached to the hip
braces to allow adjustment of seat; buckle could alternately be mounted to the seat
with the strap fastened to the hip brace, this also makes it easier if desired
to attach the strap on the outside of the hip brace. Leave the part without the
buckle long enough that you can easily grab it to adjust the backband.
 Adjustment buckle on strap attached to
hip brace, these can be made from the cinch straps that are sold for camping
gear, look for a set with strong buckles, they are helping to secure you in
place in the boat.
To cut the
straps I use a soldering iron with a flat tip, this cuts neatly and seals the
end of the straps to prevent fraying at the same time.

